Create an Advance Reservation via Online Booking

This is a direct, online booking capability for every spa Guest.


1. On the Settings Dashboard page, click the “Click to Book” button to make a reservation or Scan the QR code.


2. Fill in the booking details and click the “Confirm” button to proceed.


3. Fill in the information and click the “Save Your Details” button.


4. Confirmation message will pop up as below. You will also receive a confirmation email or SMS.


5. Please note that if your preferred time/therapist/room is not available, click the “Click Here” button on the lower part of the booking. Then fill in your preferred treatment booking details and it will go to the Waitlist. You will be notified when the waitlist will convert to the booking.


Quiz – Choose the correct answer.


1. How can you book online?
a. By scanning the QR code
b. By clicking the “Click to Book” button
c. Both a and b

2. What are the details you need to provide when making an online booking?
a. Treatment date and time
b. Complete name and mobile number
c. Both a and b

3. What will happen when your booking preferences are not available?
a. You will fill up your information and be added to the waitlist
b. Your treatment will be cancelled
c. Both a and b


If you need further assistance, please send an email to helpdesk@spa-tx.com

How to Add Guest to the Waitlist

It is a record when there are no available therapists or rooms that match the guest’s booking request. This allows you to view the original reservation and move it to a booked reservation status, cancel the reservation based on no availability, or make changes to the reservation details to accommodate the guest.


1. On the Settings Dashboard page, click the “Calendar” button.


2. On the Calendar page, click the “Waitlist” tab then click the “Add Waitlist” button.


3. Fill in the Reservation Waitlist as displayed below.


4. You can add treatment by clicking the “+” button. Or click the delete icon to delete a specific treatment. Click the “Save Changes” button when finished.


5. The “Reservation Waitlist” details will display like the below image. The user can hover on the comment icon and the notes will be displayed.


6. To edit the waitlist, click the 3 dots button. Ensure to click the “Save Changes” button to save the changes.


Quiz – Choose the correct answer.


1. Which one describes the Waitlist?
a. It is a record when there are no available therapists or rooms that match the guest’s booking request.
b. It is a list where customers cannot decide what treatment they will have.
c. No-show list

2. In the New Waitlist Item box, what is the maximum number of guests we can add at the same time?
a. 1
b. 2
c. 3

3. Can we add more than one treatment to the Waitlist?
a. Yes
b. No
c. Maybe


If you need further assistance, please send an email to helpdesk@spa-tx.com


Guest Check out

Check-out generally refers to the departure of the guest after the treatment and payment settlement. During this period, the user can also recommend a retail brand that is attached to the treatment.

1. On the Reservation Calendar page, click the reservation wish to check out and click the “Check-Out” button.


2. The page will show the reservation details. Click the 3 dots if need to make any changes to the booking. If no changes, the user can proceed to the “Retail Offerings” section.


3. Point the cursor on the comment symbol and the product description will display. To add the retail product to the bill, click the basket button on the right side.


4. Item price will be added as shown below. Click the basket button to add a quantity or remove the item.


5. Click the negative (-) and positive (+) symbols to deduct and add quantity, respectively. To remove an item, click the trash button.


6. To exit the Retail Product part, click the exit button.


7. The summary of payment shows on the bottom page. Click the “Next” button to complete the check-out procedure.


8. Once the booking was checked-out, the booking will be in gray.


Quiz – Choose the correct answer.

1. Can the booked treatment be changed/edited during the check-out process?
a. Yes
b. No
c. Uncertain

2. What are the details that you can see on the Retail offering page during the check-out procedure?
a. Brand and Product name
b. Description and Price
c. Both a and b

3. What is the color of the check-out booking?
a. Green
b. Gray
c. Pink


If you need further assistance, please send an email to helpdesk@spa-tx.com

Edit Booking

This function enables the user to edit the reserved booking. Change the treatment, add new treatment, give a discount, change the treatment room or the therapist, add/edit reservation notes, guest name. The user can just simply click on the booking and do necessary changes just like creating a booking.


1. On the Settings Dashboard page, click the “Calendar” button to see the bookings.


2. Find the booking details, then click the booking box and click the “Edit” button.


3. Click the 3 dots as displayed below to edit or delete the booking. While clicking the “Add Treatments” if you want to add another booking and then click the “Next” button.


4. The original booking details will be displayed and you can just edit the information by updating the booking.


5. After you edit the treatment, click the “Save Treatment Details” and the “Next” button to proceed.


6. The booking details will be displayed and if all the information is correct, click the “Confirm” button to finish.


Quiz – Choose the correct answer.


1. On which page can we edit the booking?
a. Dashboard
b. Calendar
c. Daily Summary

2. Which information we can edit on the reservation?
a. Discount
b. Treatment and reservation note
c. Both a and b

3. Can we add a new treatment on top of the original booking?
a. Yes
b. No
c. Uncertain


If you need further assistance, please send an email to helpdesk@spa-tx.com

Create a Booking

A well-organized reservation system allows users to ensure a steady flow of guests into the property.


1. On the Settings Dashboard page, click the “Calendar” button to make a reservation.


2. Click anywhere on the Reservation calendar and the “NEW RESERVATION” box will appear.


3. Choose the preferred date and time. Click the number “1 or 2” button for the number of guests.


4. Put any related notes in the space provided and click the “Confirm” button when done.


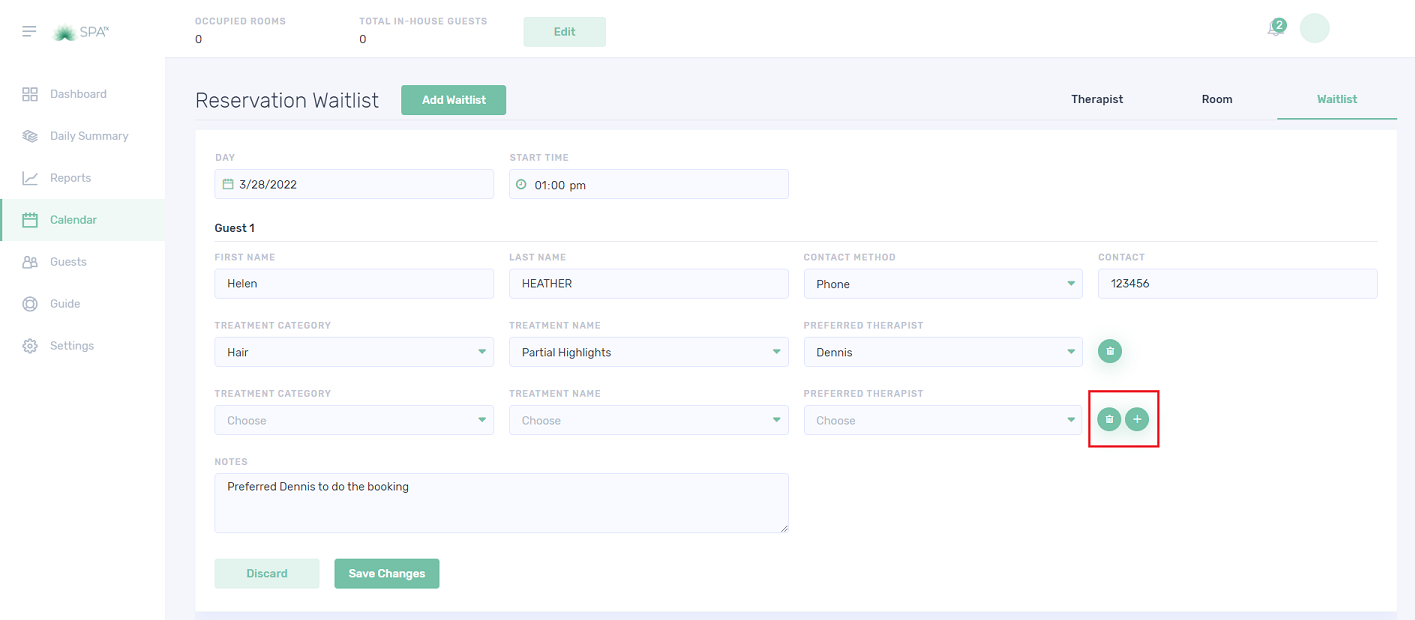
5. Choose the corresponding CATEGORY and TREATMENT by clicking the drop-down arrows.


6. All available rooms will show according to the least utilized room. Click the room to be assigned for the guest.


7. All available therapists will show according to their least utilized hour. Click the therapist to be assigned for the guest.


8. In the Pricing Model part, the user can find the prices and discounts. Prices will show in Regular, Peak, or Off-Peak rates. If it’s complimentary, click the “Make Complimentary” button. Click the “%” or “$” button for a discount. It can be applied by percentage or by amount. Special Offers will also show. Just click the button if the guest will avail of the offer and the price will be automatically added.


9. Click the “Save Treatment Details” to finish or “Discard” to cancel the booking.


10. Click the “Add Treatments” button to book another treatment. Or click the “Next” button to proceed with the booking. Note that the treatment price is summarized at the bottom.


11. Choose the guest’s name on the box. For returning guests, the profile can be searched by Name, Email, or Phone Number. For a new guest, choose the “+ Add New” button and fill in guest details to save the guest profile.


12. The total number of guests will appear on the top. Click the “Next” button to proceed.


13. The system will show Guests and Treatment details. Turnaround times are preset to 15min but the user can prolong or shorten the time. Click the “Confirm” button when details are correct.


14. The booking will show in the Reservation Calendar. Click the booking to see the details.


15. Put the cursor on the         button to see any notes.


16. Note the below icons.
The check icon confirms the reservation. Meaning the receptionist provided a reminder call/email/SMS to the guest before the booking and the guest confirmed the booking.

The information icon for the reservation and guest notes

The trash icon deletes the booking

The X icon exit the Reservation box

On the bottom of the Reservation box, display the date and time when the booking was created.


Quiz – Choose the correct answer.


1. What is the Pricing model available?
a. Based, Peak, Off-peak
b. Regular, Peak, Off-peak
c. Regular, Peak hour, Off-peak hour

2. To make the booking complementary treatment, which button do you have to click on?
a. Complimentary
b. Make Complimentary
c. Give discount

3. On the calendar page, what is the pink color stand for?
a. Reserved booking
b. Check-out booking
c. Check-in booking


If you need further assistance, please send an email to helpdesk@spa-tx.com

How to Convert Guest from the Waitlist

The waitlist can be converted into a booking when the request is available. The criteria are time request, treatment request, room request, and therapist request. Please note that guest confirmation is needed to successfully convert the waitlist into a booking.


1. On the Settings Dashboard page, click the “Calendar” button.    


2. Click the “Waitlist” button to see the waiting list.


3. Point the cursor on the comment symbol to show the note (if any). To view the details, click the “Show Details” button.


4. The “Reservation Waitlist” details will display like the image below. Click the “Move to Reservations” button to convert the waitlist into a booking.


5. The system will go to the Reservation page after you clicked the Move the Reservation button. From this page, you can create a new booking and apply if any changes.


Quiz – Choose the correct answer.


1. Where can you convert the waitlist into a reservation?
a. Waitlist tab
b. Guest profile
c. Treatment tab

2. When can you convert the waitlist into a reservation?
a. When the therapist request is available
b. When the guest request is available
c. When the therapist schedule is available

3. How can you convert the waitlist into a reservation?
a. Go to the waitlist and edit
b. Go to the calendar page and create a new booking
c. Go to the waitlist and move it to reservation


If you need further assistance, please send an email to helpdesk@spa-tx.com

Confirm Check-In

Guest’s booking is important to confirm the check-in/arrival because it helps the staff to identify and track the bookings. This involves the front desk agent verifying identity, booking numbers, and all information about the reservation.


1. On the Settings Dashboard page, click the “Calendar” button to see the bookings.


2. Find the guest’s name and confirm the booking details. The line in red color indicates the current time. The pink color is the reserved one.


3. Click the “Check In” button to check in the booking.


4. The color of the booking was changed from pink to green color.


Quiz – Choose the correct answer.


1. Where can you find the spa bookings?
a. Guest
b. Calendar
c. Dashboard

2. What is the color of the booking when it is checked in already?
a. Green
b. Pink
c. None of the above

3. On the calendar page, what is the pink color stand for?
a. Reserved booking
b. Check-out booking
c. Check-in booking


If you need further assistance, please send an email to helpdesk@spa-tx.com

Introduction to Calendar

Clear and comprehensive booking platform that includes incremental revenue drivers.
The calendar page has 3 tabs; Therapist, Room, and the Waitlist tab. Each tab helps the user to view and analyze the therapist and room utilization. Nevertheless, guests on the waitlist can easily convert into real bookings.


1. On the Settings Dashboard page, click the “Calendar” button.


2. The Calendar page or Reservation Calendar is divided into three tabs: Therapist, Room, and Waitlist.
According to the assigned therapist, all the bookings and blocks will be displayed in the Therapist tab.


3. The Therapist and Room tab can be viewed on a daily and a weekly basis by clicking the “Week” or “Day” button.


4. All the bookings and blocks will be displayed in the Room tab according to the assigned room.


5. All the guests on the waitlist can be viewed and managed on this tab.


6. Hotel room occupancy can be recorded by filling the “Occupied Rooms” and the “Total In-House Guests” boxes.


Quiz
– Choose the correct answer.

1. Which tabs are included on the Calendar page?
a. Treatment, Calendar, Waitlist
b. Therapist, Room, Waitlist
c. Calendar, Room, Waitlist

2. How can you view the waitlist?
a. By clicking the Waitlist tab
b. By adding a waitlist
c. By clicking the Therapist tab

3. Which tab can be viewed weekly?
a. Therapist
b. Room
c. Both a and b


If you need further assistance, please send an email to helpdesk@spa-tx.com