Add a Treatment Manually or Import the Treatment List

One of the tabs available on the Menu page is the Treatments tab. Here, you can add, edit, or delete a treatment and manage the details such as category, price, information, benefits, and session time. You can manually add the treatment or upload the information using an excel template.


1. On the Settings Dashboard page, click the “Manage” button for the spa menu.


2. Click the “Add Treatment” button to add a new treatment manually. Take note you are in the “Treatments” tab.


3. Fill in the information needed as displayed in the image below. Benefit 1, 2 & 3 boxes can input a maximum of 30 characters only.


4. Check and click the applicable features. Or simply choose the “Select All” button if all features are available.


5. After room feature selection, all the rooms with the same feature will be displayed, and the user can select which one can be used for the treatment. Click the “Save Changes” button to complete.


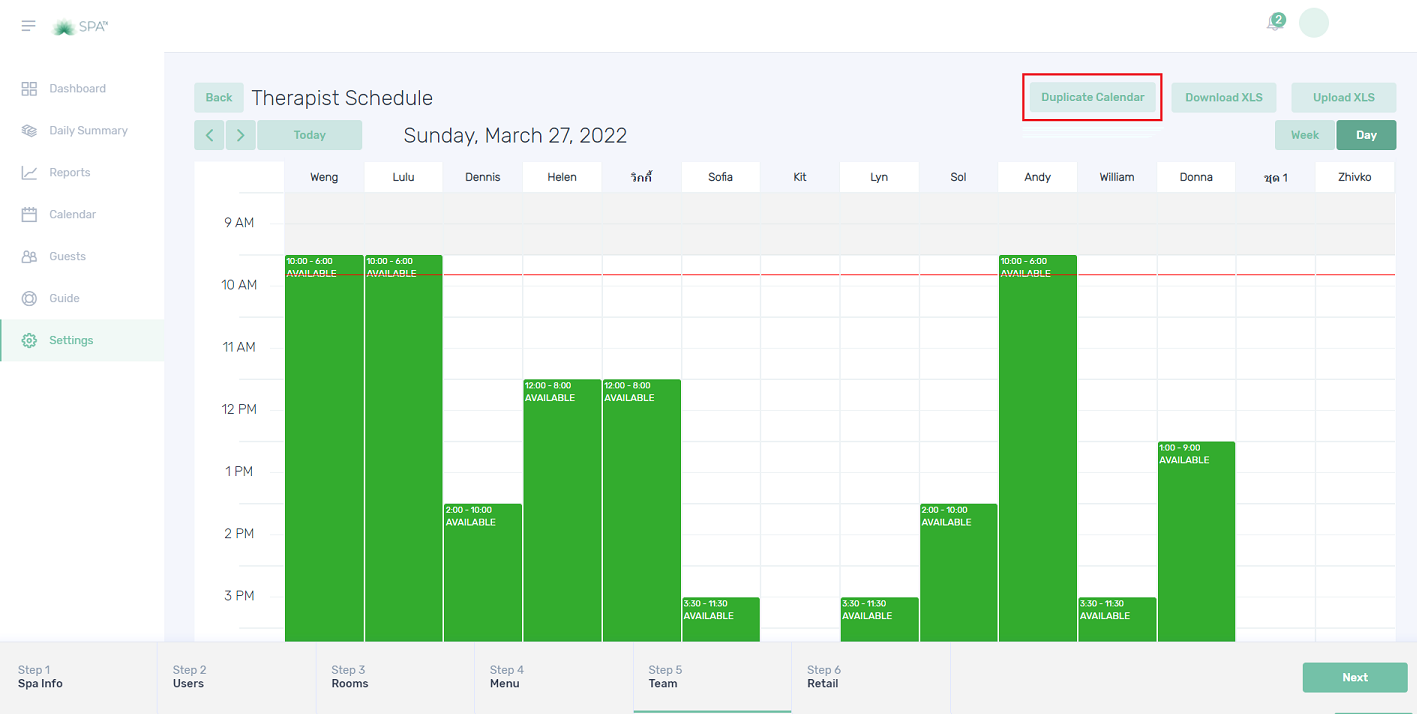
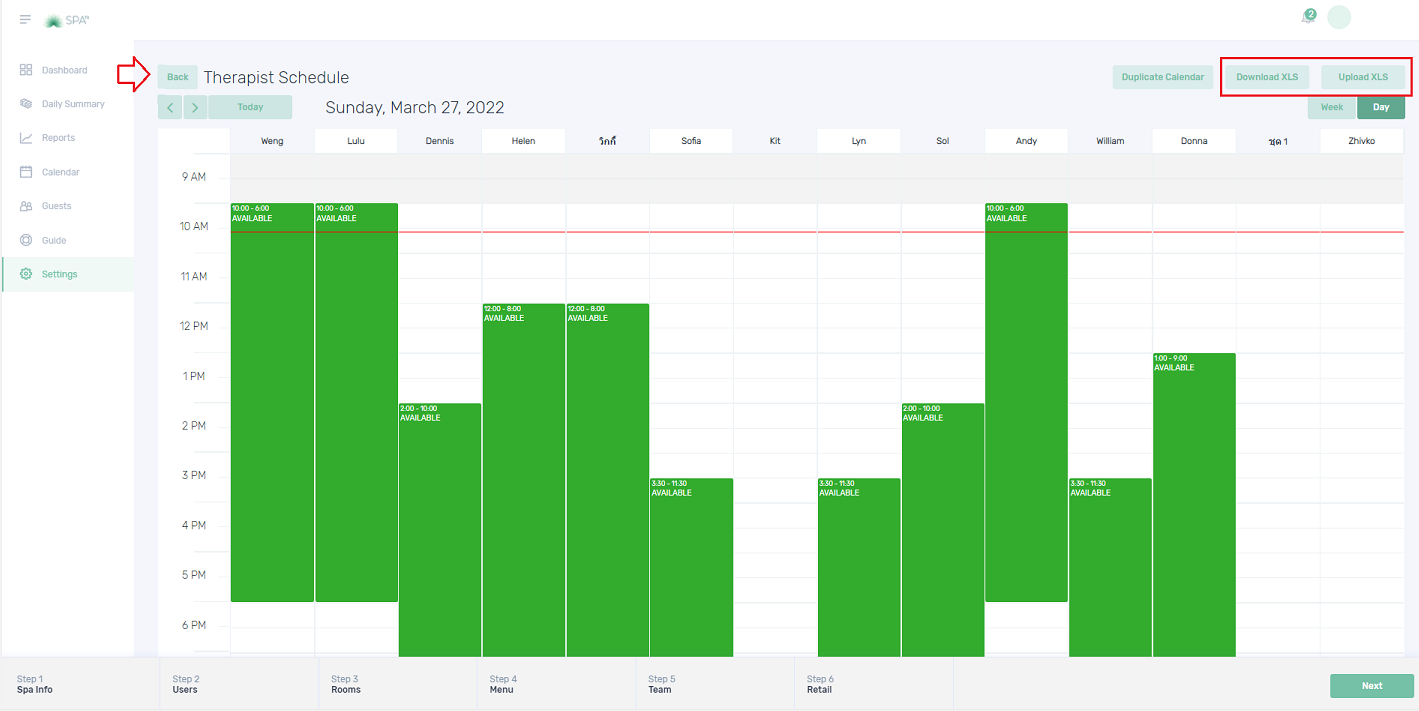
6. To upload the treatment list, you have to fill up the file using the template as the below image.


7. Click the “Upload XLS” button and attached the excel template to upload. You can also download the Spa rooms list in an excel file.


8. All the existing treatments will be displayed the same as in the below image. Click the 3 dots to delete or edit/view the treatment setting.


Quiz – Choose the correct answer.

1. Where can you set up the Treatment name?
a. Spa user settings
b. Spa menu settings
c. None of the above

2. What is the maximum character we can key in the Benefit box?
a. 10 characters
b. 20 characters
c. 30 characters

3. What are the pieces of information that we can set up on the Treatment tab?
a. Description and benefits
b. Turnaround and room features
c. Both a and b


If you need further assistance, please send an email to helpdesk@spa-tx.com

Add a Special Offer

This refers to services that are offered at reduced prices that the customer can add to their existing booking. The predefine offer will automatically appear on the booking page for easy reference and upsell of the host. It mostly lasts for 30min.


1. On the Settings Dashboard page, click the “Manage” button for the spa menu.


2. Click the “Special offers” tab, then click the “Add Special Offer” button to add a new offer manually.


3.  Fill in the information needed as displayed in the image below. Check and click the applicable features. Or simply choose the “Select All” button if all features are available.


4. After room feature selection, all the rooms with the same feature will be displayed, and the user can select which one can be used for the treatment. Click the “Save Changes” button to complete.


5. To upload the treatment list, you have to fill up the file using the template as the below image and mark the treatment name under the Special offer column.


6. Click the “Upload XLS” button and attached the excel template to upload. You can also download the Spa rooms list in an excel file.


7. All the existing special offers will be displayed the same as in the below image. Click the 3 dots to delete or edit/view the treatment setting.


8. Point the cursor on the comment          and location           symbol, and the description and arranged rooms will be displayed, respectively.


Quiz – Choose the correct answer.


1. Define Special offer treatment?
a. Special treatment
b. Complimentary treatment
c. Services that are offered at reduced prices

2. Can the special offer be booked solely?
a. Yes
b. No
c. Maybe

3. What are the pieces of information that we can set up on the Special offers tab?
a. Description/Info and turnaround
b. Price and duration
c. Both a and b

If you need further assistance, please send an email to helpdesk@spa-tx.com

Setting Up Taxes

The Tax settings can be found on the Business Info page. The user can set up the tax according to the spa or hotel arrangement by adding a new tax.


1. On the Settings Dashboard page, click the “Manage” button for the Business Info section.


2. The “Business Info” page will appear as displayed in the image below. Scroll down to see the Taxes part.


3. Click the “Other (Add Tax)” option and fill the boxes to create a new Tax. Click the “Save Changes” to finish the setup.


Quiz – Choose the correct answer.


1. Where can you set up Taxes?
a. Price settings
b. Settings
c. Business Info

2. To create a new Tax, which option do you have to click?
a. VAT
b. Enable
c. Other (Add Tax)


If you need further assistance, please send an email to helpdesk@spa-tx.com

Managing Spa Profile Information

This page is where we can fill in the spa information including the business hour. It is a company profile that acts as a window especially when the user handles multiple spa accounts. This page is being set up for a new account, or otherwise, have any changes on the business information.


1. On the Settings Dashboard page, click the “Manage” button for the Business Info section.


2. The “Business Info” page will appear for the user to fill in the boxes. Take notice that you are in the “Step 1 Spa Info” tab as encircled below.


3. You can also Enable and Disable Online booking on this page.

The minimum age for a guest is editable.


4. Scroll down to proceed with the spa hour set up. The operation hours can set up a break by choosing the break start and break end. If you want to remove the break option, just click the X button on the right side. Click the “Save Changes” whenever you do some changes to the operation hours.


Quiz – Choose the correct answer.


1. This page displays the spa profile information.
a. Spa Hours
b. Settings
c. Business Info

2. Which information we can find on the Business Info page?
a. Spa Hours
b. Business Type
c. Both a and b

3. What details can we add in General Information?
a. Business Name and Address
b. Website and Business Type
c. Both a and b


If you need further assistance, please send an email to helpdesk@spa-tx.com

Manage Therapist Schedule

On this page where the user can update the schedule of the therapist daily. There is also an option in the system that duplicates the schedule daily, weekly, or on the following month.


1. On the Settings Dashboard page, click the “Manage” button for the Spa Therapists setup item.


2. Click the “Schedule” button.


3. All the therapists’ names will be displayed. Choose the time and click the space under the therapist column and a green box will appear indicating the therapist is available at the chosen time.


4. Point the mouse to the green box and the small line will show at the center bottom. Click and drag till the duty hour of the therapist.


5. You can easily move the block by dragging to another time slot or even dragging it to other therapists to copy the schedule.


6. The time will display as the image below (12:00-8:00). Click the block and click the “Confirm” button to delete it.


7. To duplicate the schedule, go to the top page and click the “Duplicate Calendar” button.


8. Click the drop-down arrow and choose from the selection list.


9. Choose which therapist’s schedule to copy by clicking the small boxes. Then click the “Save Changes” button to finish.


10. Click the “Week” tab to view the schedule for the current week. You can view the previous or next week’s schedule by clicking the “<” and “>” buttons. Empty column means no schedule was arranged on that day.


11. The schedule can export and import the schedule.Click the “Back” button to go back to the Spa Therapists page.


12. Click the “Therapist Availability” to view the therapist schedule for the current week.


13. The “Therapist Availability” for the current week will show in a table format. This table can be exported by clicking the “Export” button. To view the previous or next week’s availability, click the “<” and “>” buttons.


Quiz – Choose the correct answer.


1. Where can you set up the therapist schedule?
a. Spa therapist profile
b. Therapist availability
c. Spa therapist schedule

2. How can you view the therapist schedule next week?
a. By clicking the “Week” button
b. By clicking the “>” button
c. By clicking the “Week” button then click the “>” button

3. What are the 2 tabs on the Spa Therapists page?
a. Schedule and Therapist list
b. Schedule and Therapist availability
c. None of the above


If you need further assistance, please send an email to helpdesk@spa-tx.com

Link Special Offers to a Treatment

Here we can link or connect the special offers to a specific treatment. We can link a maximum of 3 special offers to each treatment.


1.  On the Settings Dashboard page, click the “Manage” button for the spa menu.


2. Click the “Matching” tab and a list of existing treatments will be displayed. Click the “Manage” button to connect the special offer to a treatment.


3. Let’s take the Hydra Perfection treatment as an example. Click the drop-down arrow for the SPECIAL OFFER box and select the offer to connect to the corresponding treatment.


4. Click the “Save Changes” button to finish the matching.


5. After matching, go back to the Special Offers tab. Take notice that there is a check (✓) mark under the “ATTACHED TREATMENTS” column. Point the cursor on the check (✓) and it will display the treatment name connected to the offer.


Quiz – Choose the correct answer.


1. How many special offers can we attach to a treatment?
a. All available special offers
b. 5
c. 3

2. In the special offers tab, can we connect the retail product?
a. Yes
b. No
c. Maybe

3. What are the pieces of information that we can set up on the Special offers tab?
a. Treatment name
b. Info
c. Both a and b


If you need further assistance, please send an email to helpdesk@spa-tx.com

Link a Product to a Treatment

In the Treatment Connections tab, the user can connect a maximum of 3 retail products to a specific treatment. This means you can choose the products that are suitable or most recommended for the guest to use as home care products.

It is easier for the receptionist to recommend products that are suitable for their treatment.


1. On the Settings Dashboard page, scroll down and click the “Manage” button for the Retail Offerings.


2. Click the “Treatment Connections” tab and the list of existing treatments will be displayed. Click the “Manage” button to connect the retail products to a treatment.


3.  Let’s take the Hydra Perfection treatment as an example. Click the drop-down arrows and select the product to connect to the corresponding treatment. Click the “Save Changes” button to complete.


4. After the connection, go back to the “Retail Products” tab. Take notice that there is a check (✓) mark under the “ATTACHED TREATMENTS” column. Point the cursor on the check (✓) and it will display the treatment name connected to the offer.


5. The below image is an example of how does Retail Offerings work during the check-out procedure.


Quiz – Choose the correct answer.


1. What is the importance of having the “Treatment Connections”?
a. Professional staff can link the products that are suitable or most recommended for the guest to use as home care products.
b. It is easier for the receptionist to recommend the appropriate product during the check-out procedure.
c. Both a and b

2. How many products can you connect to a treatment?
a. 3
b. 5
c. 10

3. Will the product info or description being displayed on the check-out page?
a. Yes
b. No
c. Maybe


If you need further assistance, please send an email to helpdesk@spa-tx.com

How to Set Up a New Brand and a New Product

On the Retail Offering page, you can add the brands and brand products here and manage the details accordingly. You can also edit and delete if necessary. You can manually add the treatment or upload the information using an excel template.


1. On the Settings Dashboard page, scroll down and click the “Manage” button for the Retail Offerings.


2. On the “Retail Brands” tab, click the “Add Retail Brand” button to add a new Brand manually.


3. Fill in the details and choose from the “Types” selection. Click the “Save Changes” button to complete.


4. To edit or delete the brand, click the 3 dots (…) button.


5. To add a new retail item, click the “Retail Products” tab, and then click the “Add Retail Item” button to add it manually.


6. Add the retail products that are being used in the spa and set the price for that retail product. The user can also fill in the description that will also serve as a reminder of the product benefits to the host when selling the item.

Click the “Save Changes” button to complete.


7. After the retail product was created, point the cursor on the comment symbol, and the description will be displayed.


8. To edit or delete the brand, click the 3 dots (…) button.


9. For retail brands and retail products, you can upload the file using an excel template by clicking the “Upload XLS” button.


Quiz – Choose the correct answer.


1. What are the 2 information that you can set up on the Retail Offering page?
a. Complimentary product
b. Complimentary treatment
c. Retail brands and Retail products

2. Can you set up the product discount in the retail Offering?
a. Yes
b. No
c. Maybe

3. Where can you put the product description?
a. Retail brands
b. Retail products
c. Both a and b


If you need further assistance, please send an email to helpdesk@spa-tx.com

Introduction to Retail page

On this Retail Offering page, you can manage all the retail brands and retail products.

There is a special feature called Treatment Connections wherein the user can connect the retail product to a specific treatment. It is easier for the receptionist to recommend products that are suitable for their treatment.


1. On the Settings Dashboard page, scroll down and click the “Manage” button for the Retail Offerings.


2. Here is the overview of Retail Brands.


3. Below is the overview of the retail products. You can hover over the icons and you will see the product description and what treatment is the product is suitable for.


4. Treatment Connections tab will be displayed the same as the below image. A maximum of 3 products can be associated with every treatment. The treatment information/description is also visible.


Quiz – Choose the correct answer.


1. What are the three tabs in the Retail settings?
a. Retail Brands, Retail Products, Retail Connections
b. Retail Brands, Retail Products, Treatment Connections
c. Retail Brands, Retail Products, Retail Matching

2. In the Retail Products tab, what are the 2 correct pieces of information that can be found on the page?
a. Brand
b. Product description
c. Both a and b

3. Which one is correct?
a. There is no maximum product that can be associated with every treatment
b. There is a maximum of 3 products that can be added to every brand
c. None of the above


If you need further assistance, please send an email to helpdesk@spa-tx.com

Introduction to Therapist Page

On this Therapists page, you can manage all the therapist or staff’s profiles. You can put the start date, set their roles, and add the schedule. You can manually add and edit the profile, or upload information using an excel template.

Therapist availability for the week is also viewable in a table format.


1. On the Settings Dashboard page, click the “Manage” button for the Spa Therapists section.


2. The list of existing Spa therapists will be displayed with their corresponding roles and start date.


3. Therapist’s Schedule can be arranged on this page. It can be duplicated and viewed by day or weekly.


4. Therapists’ schedules for the current week can be viewed on the Therapist Availability page.


Quiz – Choose the correct answer.


1. Where can you set up the therapist profile?
a. User Management
b. Therapist Availability
c. Spa Therapists page

2. Which page do you have to check to view the therapist’s availability for the week?
a. Therapist roles
b. User Management
c. Therapist Availability

3. Which information we can put on the Therapist profile?
a. Therapist home address
b. End date
c. Roles


If you need further assistance, please send an email to helpdesk@spa-tx.com

Add a Therapist Manually or Import the Therapist List

On this Therapists page, where you can manage all the therapist or staff’s profiles. You can manually add and edit the profile, or upload information using an excel template.


1. On the Settings Dashboard page, click the “Manage” button for the Spa Therapists section.


2. Click the “Add Therapist” button to add a new therapist manually.


3. Enter the details of the new therapist. The user can select multiple roles.


4. For the “TREATMENT CATEGORIES”, click the drop-down arrow and choose a category. All treatments will show the same as the image below. The user can unclick the boxes if the therapist is not qualified to do a specific treatment within the category.


5. Click the plus “+” symbol to add a new category while clicking the trash symbol will remove the category.

Click the “Save Changes” button to finish.


6. To upload the therapist/staff list, you have to fill up the file using the template as the below image.


7. Click the “Upload XLS” button and attached the excel template to upload. You can also download the therapist list in an excel file.


8. The existing therapist will be displayed the same as the below image. The user can click the “Show Details” button to view the assigned treatments and rooms for the therapist.


9. Click the 3 dots to delete or edit the therapist’s profile.


Quiz – Choose the correct answer.


1. Can you choose multiple roles for a therapist?
a. Yes
b. No
c. Maybe

2. Are we allowed to import and export the therapist lists?
a. Yes
b. No
c. Maybe

3. Are you able to unassign specific treatment to a therapist within the category?
a. Yes
b. No
c. Maybe


If you need further assistance, please send an email to helpdesk@spa-tx.com

Create a Room Manually or Import the Room List

All the spa treatment rooms can be managed on the Rooms page. You can manually add and edit the room, add features and choose the type of room. This can also be done by uploading the room list using an excel template.


1. On the Settings Dashboard page, click the “Manage” button for the Spa Rooms section.


2. Click the “Add Room” button to add a new room manually.


3. Fill in the information in the NEW ROOM box. The user can select the type of room by clicking the drop-down arrow.


4. Click the small box for the available features in that room. Then click the “Save Changes” to finish.


5. To upload the room list, you have to fill up the file using the template as the below image.


6. Click the “Upload XLS” button and attached the excel template to upload. You can also download the Spa rooms list in an excel file.


7. The existing rooms will be displayed the same as the below image. Click the 3 dots to manually delete or edit/view the room settings.


Quiz – Choose the correct answer.


1. Where can you set up the spa treatment rooms? 
a. Dashboard 
b. Settings 
c. Spa menu 
 
2. Which function is available to set up the room? 
a. Features 
b. Max guests 
c. Both a and b are correct 
 
3. Which box do you need to fill in when adding a new room? 
a. Room box 
b. Spa rooms 
c. New room 


If you need further assistance, please send an email to helpdesk@spa-tx.com

Introduction to the Menu Page

The menu setting is where you assign and manage the Spa menu and it has divided into three sections;

Treatments – in this section, you can manage all the spa treatments according to category, price, duration, turnaround time, treatment description, and benefits.

Special offers – this refers to services that are offered at reduced prices that the customer can add on to their existing booking. It mostly lasts for 30min.

Matching – this is a special feature wherein you can match or link the Special offer to a specific treatment. It is easier for the receptionist to upsell appropriate treatment as it is predefined already.


1. On the Settings Dashboard page, scroll down and click the “Manage” button for the spa menu.


2. The treatment details will be displayed the same as in the below image.


3. The Special offers will be displayed the same as the below image.


4. All the treatments with suggested add-on treatments will be displayed in the Matching section.


Quiz – Choose the correct answer.


1. Which one is not included in the Menu settings?
a. Treatments
b. Special treatments
c. Matching

2. Where can you set up the menu?
a. Treatments
b. Special treatments
c. Settings

3. This is a special feature wherein you can match or link the Special offer to a specific treatment?
a. Add-on treatments
b. Special offers
c. Matching


If you need further assistance, please send an email to helpdesk@spa-tx.com


Create / Edit a User Management

All spa has two types of user levels; the Manager User and the Spa User. On this page, you can add multiple spa users. You can also edit the user information, activate or deactivate the account.


1. On the Settings Dashboard page, click the “Manage” button for the Spa Management section.


2. Click the “Add User” button to add a new user.


3. Fill in the information in the NEW USER box and click the “Save Changes” button to finish.


4. The existing users will be displayed the same as in the below image. Click the 3 dots to view, edit or delete the existing user profile.


5. The user status can change by clicking the drop-down arrow and clicking the preferred status.


6. Click the “Save Changes” button if you edit the user profile.


Quiz – Choose the correct answer.


1. Where can you add a new user account?
a. User Management
b. Therapist Availability
c. Spa Therapists page

2. What are the two types of users available?
a. Spa and User
b. Manager and User
c. Spa and Manager User

3. What information do you need when creating a new user account?
a. Email address
b. Password
c. Both a and b


If you need further assistance, please send an email to helpdesk@spa-tx.com